Disclaimer: this guide is partially AI-generated (Claude Opus 5.0 via Claude Code).
Moving Solveig a short distance and leaving her at anchor
This is an ad-hoc guide, written in a hurry for someone who may need to move S/Y Solveig a few nautical miles under engine and leave her anchored up. It is not a full handover briefing and it does not replace seamanship — it only covers the boat-specific things that are hard to guess: which switch is which, and how to start the engine. There are also some laminated checklists in the cockpit. It assumes the ship is moored on the west side of the pier in the yacht club, with the port side facing the pier.
1. Before starting: check the engine oil and turn on useful switches
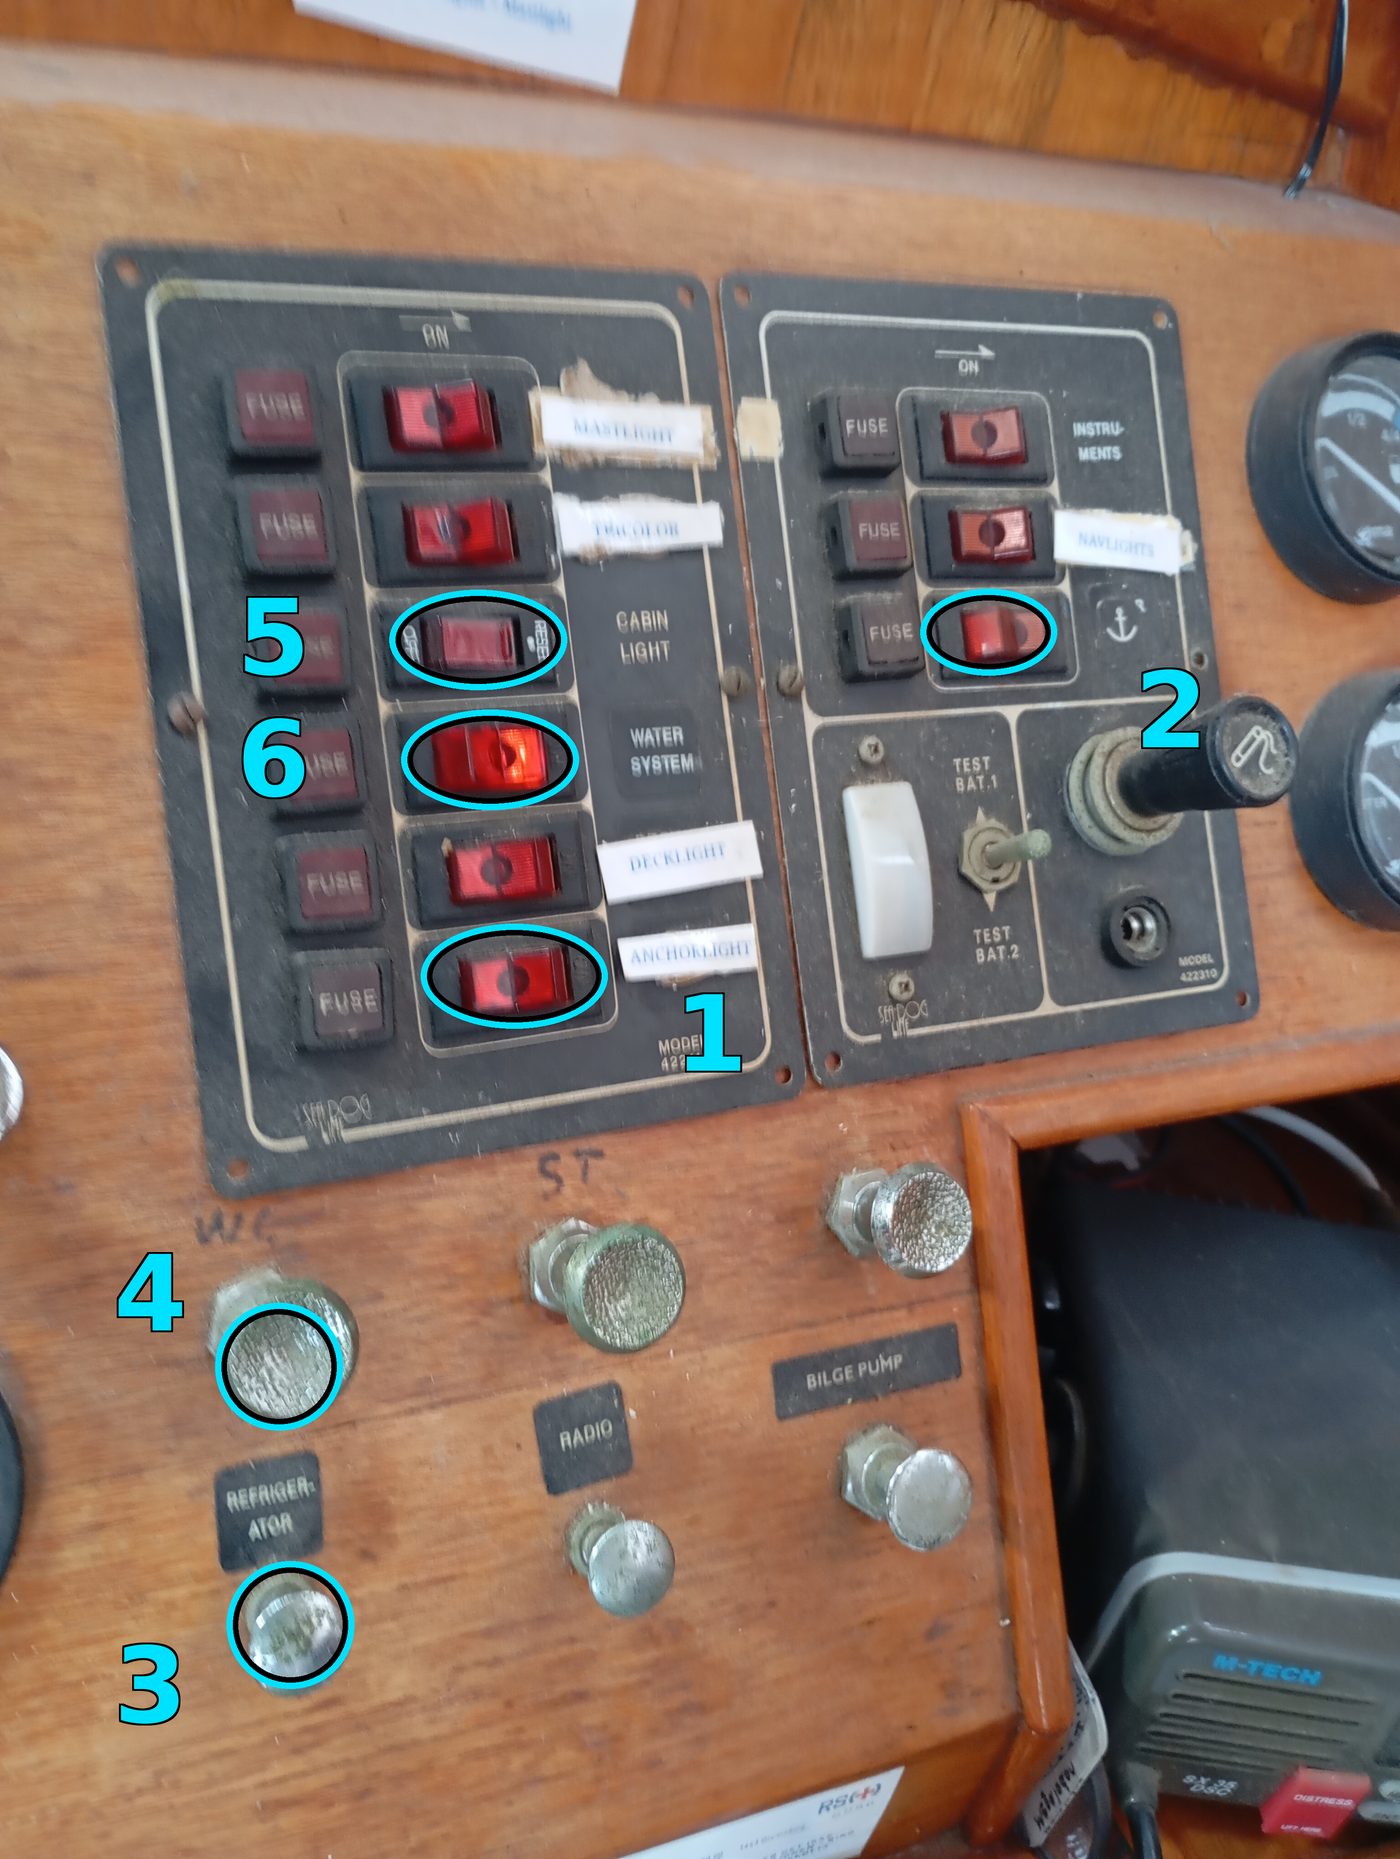
While you're on board, it may be nice to have the WC, the water system and the
cabin lights turned on. That's switch 4 (WC), 5 (cabin light) and
6 (water system) in the photo below. Switch 3 (refrigerator) should
already be on — leave it that way. When you turn on the water system, pumps
on board may start running. They should stop within 30 seconds. If they
keep running for several minutes, turn WATER SYSTEM off again.
Check the oil level on the dipstick before you set off. If it is below the lower mark, top up before starting; do not run the engine on a dry sump.
I assume you're going to move the boat in daylight — otherwise NAVLIGHTS
and MASTLIGHT should be on while under way under engine.
There are life vests in the cockpit. Make sure you also know where the fire extinguishers are. Ask for the fuller Guide for navigating Solveig if you want more information.
2. Starting and stopping the engine
The Volvo Penta EVC panel is in the cockpit, on the starboard side of the binnacle.
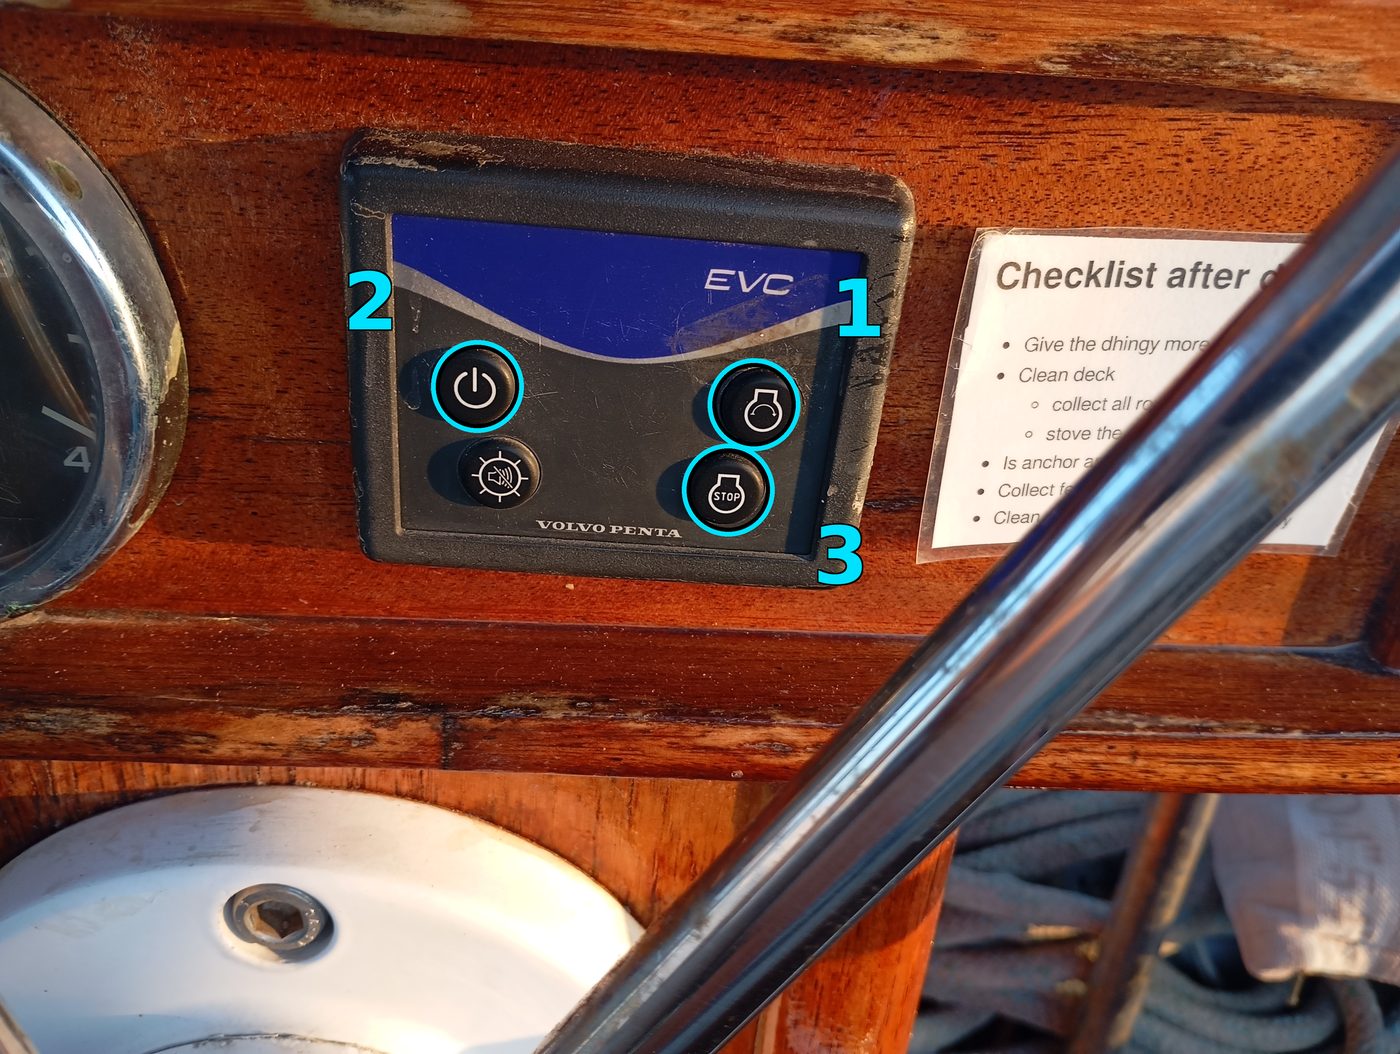
- Start: press and hold the top right button (start) for about 3 seconds.
- If nothing happens, press the top left button (on/off) once, then try the start button again.
- Stop: press and hold the bottom right button for about 3 seconds.
Before starting or stopping, make sure the gear lever is in neutral, and check that the stopcock for the engine cooling water is open. Once the engine is running, check that cooling water is coming out with the exhaust — if it is not, stop the engine.
3. Before departure: pull the two AUTO PILOT breakers
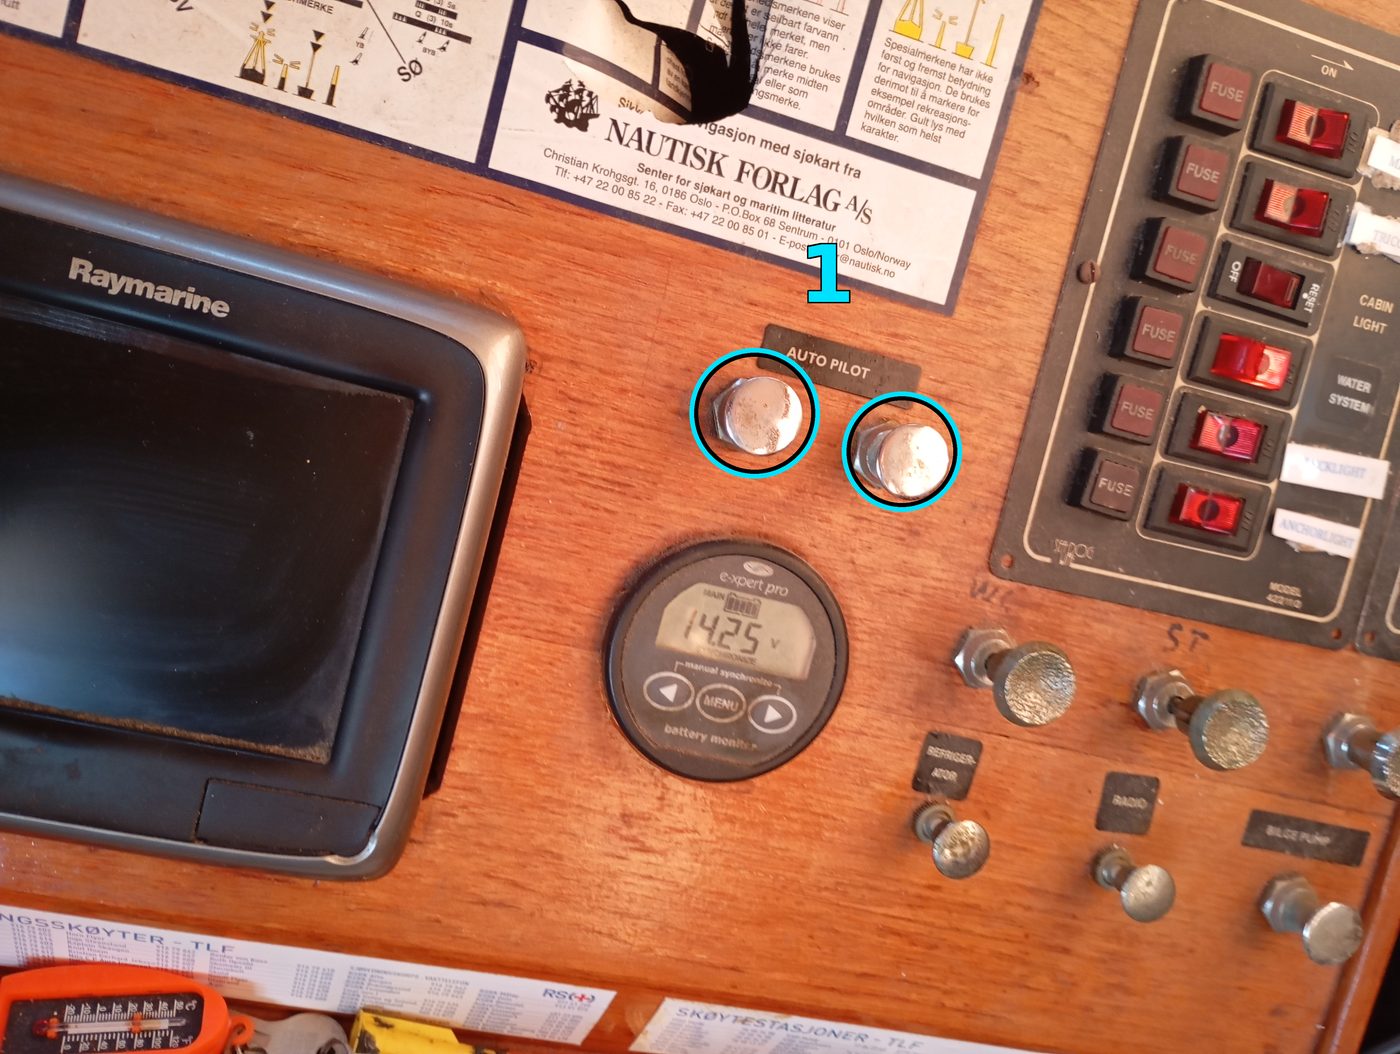
Several circuits on Solveig are switched with push/pull breakers — the round chrome knobs at the chart table. Pushed in is off, pulled out is on.
We have some problems with the electricity at the moment: the voltage drop
when starting a cold engine may cause the plotter to crash, so start up the
navigation systems only after starting the engine. Once the engine is
running, pull out both breakers marked AUTO PILOT at the chart table.
Despite the label, these switches are for the nav systems in general — do
not use the autopilot, as it is currently disengaged and waiting for me to
do some epoxy and fibreglass work.
4. Departure
There is nothing to make ready for sea — no shore power to unplug, the bathing ladder is up already, and the trip is a short one on flat water.
Be aware that the stern is what you have to watch. Turning the rudder hard to starboard and giving speed will swing the stern towards port — that is, towards the pier. It's important that the wooden stern does not touch the concrete pier.
There is a bow thruster. It can be used to move the bow to starboard, but I would rather it was not used — for one thing, the electrical system is not built for running it.
Usually there is a westerly breeze in the early morning and an easterly breeze during the day (thermal land/sea effects), but it may vary.
Departure in light winds or with a tailwind
Let the stern rope be the last one to be cast off. If you put the boat in forward gear with the stern rope attached, it won't go anywhere. Just remember to put it back into neutral before removing the stern rope — or into reverse, if there is a tailwind. Push the boat physically away from the pier before you leave.
Departure in westerly winds
In westerly winds the ship will be pressed towards the pier. If there is not too much wind, one person pushing the ship off during the departure is enough. Remember that turning the rudder too far to starboard swings the stern to port, so watch the distance between the stern and the pier the whole way out.
You probably should not try to leave in strong westerly winds, but the way to do it is like this — read it through, understand it and prepare properly before you start:
- Rig a relatively short stern "spring": from the stern cleat, 180° around a fixing point on land, and back to the stern of the boat. Make sure the rope will slide off easily when the last end is released from the ship. Remove all other mooring ropes.
- Put the big ball fender at the stern, but not too far aft — some 30 cm forward of the cleat.
- When everyone is ready, give a good deal of engine power astern. The bow may then start to move to starboard.
- The bow can be helped along a bit by someone pushing, or by the bow thruster. If you use the thruster, the navigation systems may black out. It must not be run for long either; the batteries are not strong enough to power it for more than a few seconds. (Several kilowatts at 12 V — it's madness! I wish I had a 48 V thruster; my 48 V battery bank would be strong enough to power it. But I digress.)
- Once the angle is good enough, one person should very quickly untie the rope
and pull it in, while someone else turns down the throttle, changes from
reverse to forward gear and then gives full speed ahead. This is the most
critical part:
- The rope may get stuck. It is very bad if the boat has already picked up significant speed and is then held back by the rope. Having a helper stay behind on land may be a good thing, but they should be careful not to get their fingers chopped off.
- Too much wind, and there is a risk of crashing into the pier before the boat has proper speed away from it.
- Rudder too far to starboard, and the stern may crash into the pier.
Departure in strong headwinds
The easiest way is to use the stern spring, as described for westerly winds — just be aware that things will move really quickly as soon as the wind starts pushing on the port side of the bow. That may easily happen without any engine power at all.
The epic failure here is not being able to release the stern spring quickly enough: the ship is then twisted around, and the stern and/or the starboard side is smashed into the concrete. Please avoid it!
Departure in easterly winds
Easy peasy. Safest options:
- With a helper on land, let them cast off — first all the springs and the ropes to the mid-cleat, then the bow rope, and the stern rope last.
- Without a helper, rig the bow and stern ropes as slip lines: from the cleat on the boat, around a fixing point on land and back to the boat. That way the last ropes can be let go from on board instead of from the shore.
5. Anchoring
I want the anchor set at 43°12.474' N / 027°52.376' E — it's a mud bottom, the anchor will sit very well. I do not remember the depth, but I believe the display shows 4 m.
To be safe, the rope length should be 5× the distance from the bow platform to the bottom. There is a ~2 metre offset on the depth reported by the Raymarine system, and the bow platform is ~1.5 metres above sea level. So if the Raymarine system says 4.0 m depth, first add 3.5 m to it — 7.5 m — and then multiply by 5: 37.5 metres of rope will be needed. Two anchoring ropes are ready on deck; the dark rope attached to the anchor is ~27 metres long, and the white extension rope is ~32 metres long. If the meter reads more than 8.3 m depth, additional rope will be needed.
The anchor is dropped by gravity; the windlass is not needed. When leaving the boat at anchor for a longer time, it's nice to make a balanced setup: take a mooring rope, make a Y-split (using a butterfly loop or a gripping knot) and attach one leg to the starboard cleat and one to the port cleat.
Chain may be a bit more secure than rope — the chain is currently in a heap behind the cockpit. You may consider using it, but it's difficult right now, as it cannot be run through the windlass without damaging the woodwork (work in progress). For now it's easiest just to use the ropes.
After dropping the anchor and letting out all the rope, set the anchor properly by running the engine in reverse. Keep the speed below 0.5 knots at all times, and gradually increase the engine speed until the anchor is sitting really well. Run the engine at full throttle for about ten seconds at the end, checking (e.g. by GPS) that the boat does not move at all. The anchor may move a bit during the process.
Make sure the boat can swing freely around the anchor (both the radar view and the chart view on the plotter show distances in metres if you click on a nearby object).
If you have to weigh the anchor again and can't manage to pull the rope in by hand, use switch 2 on the panel below to turn on the windlass.
6. After the anchor is set: switches at the chart table
Turn on:
- 1 — anchor light (bottom rocker on the left panel, labelled
ANCHORLIGHT). It has to be on whenever the boat is left at anchor.
Leave on — this is the important one:
- 3 — refrigerator. Check that it is still on (pulled out). Do not switch it off.
Turn off again — the ones from section 1:
- 4 — WC
- 5 — cabin light
- 6 — water system
Switch 2 — windlass relays should be left off. Only turn it on if you actually need the windlass to weigh the anchor again (see section 5), and turn it off again afterwards.
The navigation systems should be shut down as well: switch off the navigation
lights and the instruments on the right panel, and push in the two
AUTO PILOT breakers from section 3 (pushed in is off). The remaining
switches on the left panel are labelled on the panel itself: deck light, mast
light, tricolour — those should be off too.
Before you leave her: anchor light on, refrigerator on, everything else off, and the hatches shut.
7. Getting ashore
There is an electric pump on board for inflating the SUP, which is how you get off the boat once she is anchored. I usually take it up to 12 psi. Before pumping, make sure the stick in the valve is rotated and pulled out — otherwise the air will flow straight out of the SUP again as soon as the pump is removed.
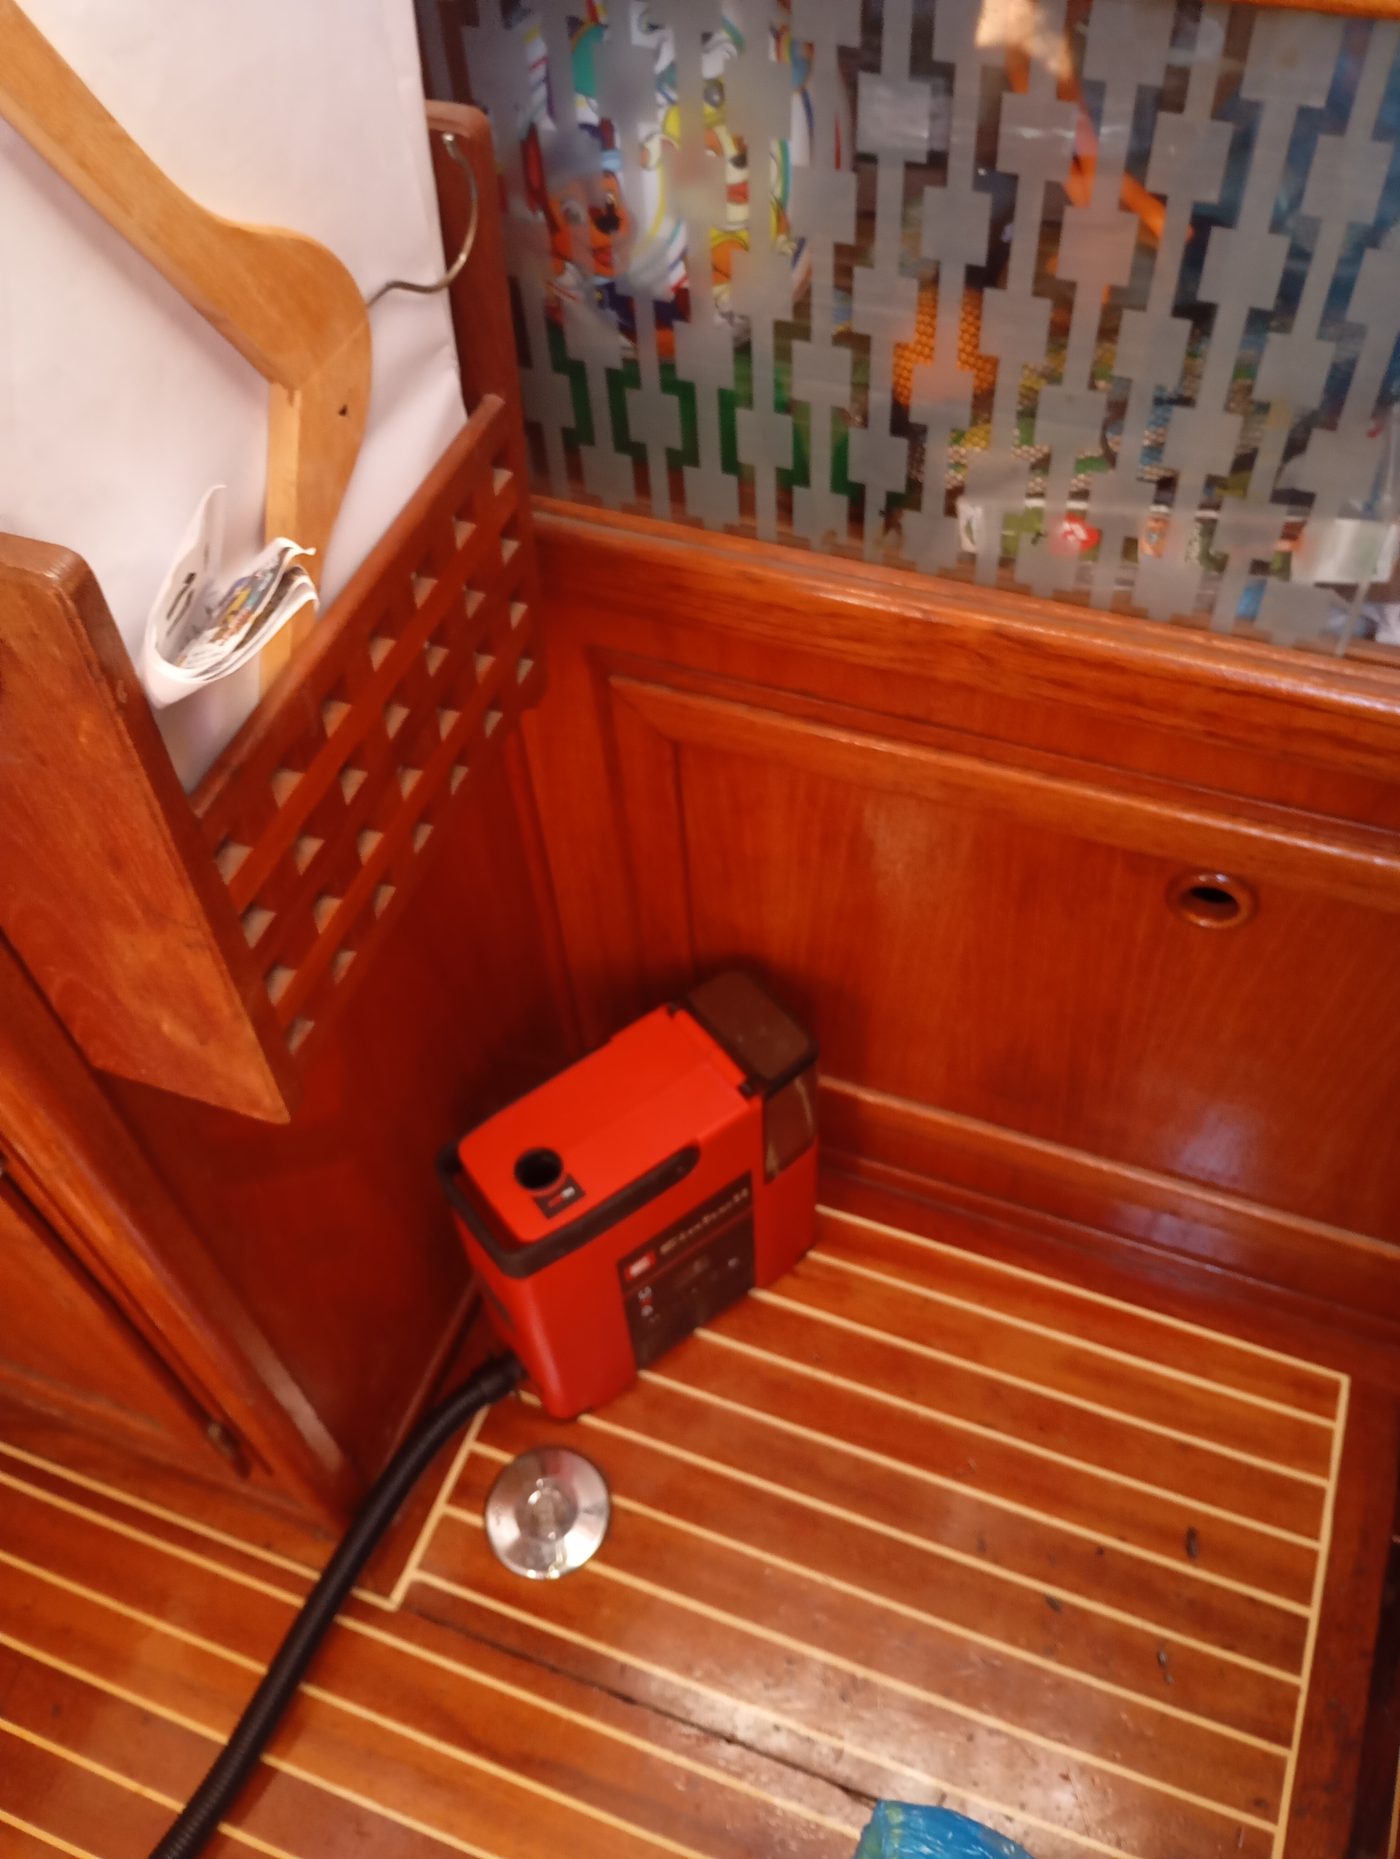
The pump should lie flat while it is running (see the instructions on it). If there are several of you, use the yellow/orange (floating) ropes to pull the board back to the ship after each person has landed. It's extremely annoying to be five metres from land and then not have enough rope, so the person on board should be ready to add even more rope if needed. Make sure to leave all the ropes on board when the last person leaves. Two people on the board at the same time may work. I wouldn't voluntarily swim in the dirty water of Lake Varna.
Also read the laminated Checklist after ... card in the cockpit, next to the engine panel.